Online Tutorials


Video Workshop: Designing a Fresh Floral Arrangement in a Stunning Glass Vase

April 15, 2020 – In this video, Gina takes you through a step-by-step tutorial on designing a fresh flower arrangement in a tall vase. She shares a lot of great tips: how to use floral tape, why it’s important to use more than one type of greenery, working with tricky tulips, “breaking” the line of the container and more. Click on the image below…


Tutorial: How to Use an Orange as a Vessel for Flowers

July 2017

Fruits are used in floral arrangements in many ways whether they are incorporated into the actual arrangement, used as a vase filler or as the vessel itself. In this tutorial we’ll show you how to create your own orange vessel filled with a simple floral arrangement. We used these as decorations for individual place settings that could be taken home by each guest. You can see the full table design HERE.

Supplies Needed:
Oranges (you will be using ½ orange for each arrangement)
Wet floral foam
Green roses
Assorted greenery
Floral Knife
Knife for cutting orange in half
Melon Baller

1. Start with oranges. You will need ½ orange for each arrangement
2. Cut oranges in half.
3. Run knife along the edge first and then hollow orange half with a melon scooper.
4. Scoop all pulp out using a melon scooper.

5. Place soaked and cut to size wet floral foam in each orange half.
6. Gather roses and greenery. We choose green roses as a nice compliment to the orange.
7. Begin placing two roses in each half and continue covering floral foam with greenery.
8. And here you have a wonderful small arrangement for a place setting that could easily be used as a take home gift. How fun is that?

SaveSave

SaveSave

SaveSave

SaveSave

SaveSave


Tutorial: How to Make A Floral Arrangement Using Chicken Wire

June 2017

Before the invention of floral foam, floral designers used a variety of materials to arrange flowers, including chicken wire. Chicken wire helps to create a secure design while at the same time allowing the flowers to be placed directly in water. Flowers are at their best when they have a great source of water. We will show you step by step how to create a lovely but simple arrangement using chicken wire. You can find chicken wire in a hardware store, craft store or online. Another great thing about chicken wire is that it can be reused. Let’s get started.

What you’ll need: chicken wire, fresh cut flowers, a container, scissors and floral preservative.

1. Gather chicken wire.
2. These flowers came directly from my garden so they were freshly cut. If you get flowers from a store, make sure to give them a fresh cut.
3. Cut the chicken wire so that it will fit tightly inside the container. It can be a little larger and then pressed into the container for stability.
4. Here you see the chicken wire in the container.

5. Fill the container with water and floral preservative.
6. Begin placing flowers into the container and in the chicken wire for security.
7. Continue placing flowers.
8. Before you know it, the container will be full and the flowers will be very happy directly in the water.

SaveSave


Tutorial: Sunflower Power

May 2017

Sunflowers are happy flowers that command attention. With very little effort you can create a dramatic arrangement with these striking yellow beauties. We’re taking advantage of the width of the sunflowers rather than their height in this design. For this very simple tutorial you’ll only need 3 flowers but that’s all it takes to showcase the positive power of sunflowers.

Here are the supplies you will need:
3 medium to large sunflowers
One clear glass vase about 7-8 inches tall with about a 3 inch wide mouth
Floral preservative
Assorted greenery
Ribbon

sunflower tutorial

1. Cut the sunflowers at 3 different heights so that they can be placed in a staggered fashion once in the vase
2. Arrange the sunflowers in the vase filled with water and flower preservative. Place the tallest flower in the back and the two shorter ones up front.
3. Fill in with assorted greenery.
4. Cut the ribbon long enough that a square knot can be tied. Tie the ribbon and you’re done!

This is a very sweet arrangement that could certainly put a smile on someone’s face. The best part is you only used 3 flowers.

SaveSave


Tutorial: Sunflower Topiary

May 2017

Today we’re showing you how to make this sweet sunflower topiary. It will brighten up any spot in your home and also makes a wonderful gift. Best of all, it’s easy to do…let’s get started..

What you’ll need: Sunflowers, two other kinds of flowers (we used roses and hydrangea), floral wire, floral preservative, wet foam, a plastic container deep enough to immerse the foam in water, a container, a liner to fit the container, ribbon.

1. Select sunflowers and one or two other flowers. We choose bright coral roses and green hydrangea.
2. Prepare a container. Even though this container is waterproof and we have a saucer, we are placing a plastic container in the bottom to prevent any moisture damage.
3. Soak the wet oasis floral foam in a plastic container prepared with water and floral preservative. Simply wait for the foam to soak up the water. There is no need to press the foam down as this could create dry pockets.
4. Cut and fit the floral foam into container making sure there is a tight enough fit allowing the flowers to remain stationary.

sunflower topiary 5 -8

5. Gather sunflowers tightly making sure they are about the same height. Look at them from each direction to make sure the all of them are facing outward. Wrap them with a floral wire.
6. Insert all stems at once into the center of the floral foam.
7. Here the sunflowers are in place.
8. Start to cover the foam with remaining flowers. We chose a combination of coral roses and hydrangea but all greenery or just one type of flower would work great.

sunflower topiary 9 - 12

9. Continue adding flowers until the foam is completely covered. It is also a good idea to cover the rim of the container. This could be done with moss if you used only the roses.
10. Prepare a piece of ribbon making sure it is long enough to make a criss cross pattern on the sunflower stems. Begin at the wire making sure the ribbon covers it. Continue wrapping in a criss-cross fashion until you reach the bottom of the sunflower stems.
11. Here is the wrapped ribbon. You will tie it off once you get to the end. If there is any extra ribbon you can cut it off.
12. And here you have a very happy, sunflower topiary arrangement!

SaveSave


Tutorial: Aging Terracotta Pots with Lime 2 comments

May 2017

Today, we are going to show you how to make new terracotta pots look aged with a light white patina. An aged planter just looks like it has a story to tell and you may not want to wait years to get that look! So, let’s get started…

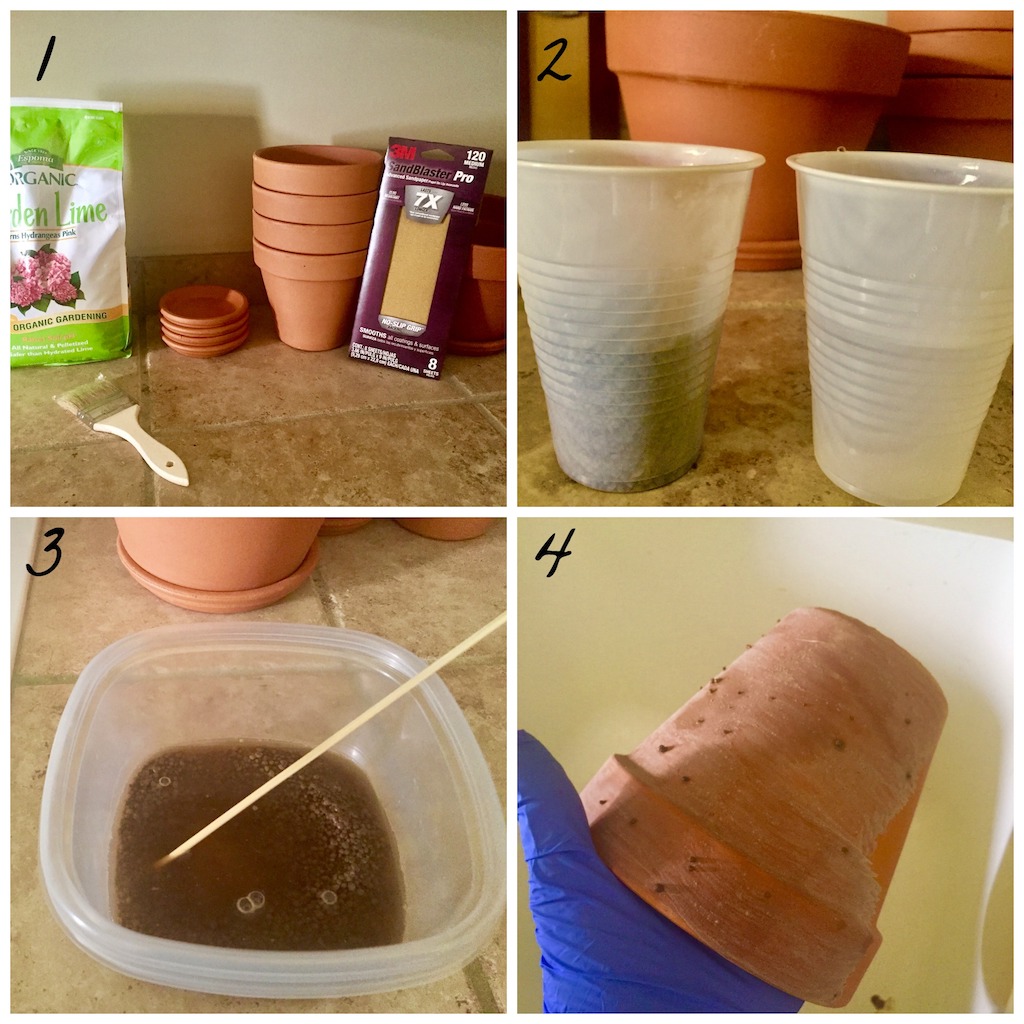
1.For this project you will need the following supplies: terracotta pots and correct size saucers, garden lime (found in a bag in a garden center), a medium grade sandpaper (look in the paint department for sheets instead of the type that attach to an electric sander), an inexpensive paint brush (we paid .98 cents for ours), 2 disposable plastic cups, a stir (we used a bamboo skewer), a plastic container and old newspaper.
2. In the disposable cups, add equal parts lime to water. We used about ½ cup each.
3. Pour each into a plastic container and stir until combined. The lime will not completely dissolve and will have a sandy somewhat lumpy texture.
4. Paint the pot with the lime/water mixture. We went around the pot. It will not be opaque and you will be able to see your brush strokes. This is fine as you will be sanding it all out in a few minutes.

aging terracotta pots

5. Let the pot dry on some old newspaper. This only takes a few minutes.
6. While you have all the supplies handy, it is a good idea to prepare multiple pots so they are ready for future use. Trust us, you will be happy you did this.
7. Allow all pots and saucers to dry. Don’t they already look great?
8. Once the pots are dry you can begin lightly sanding, moving in circular motions.

aging terracotta pots

9. Here you see the pot on the left before sanding and the one on the right is after we sanded. See the smooth, natural looking surface? It’s like magic.
10.  This made a pretty big mess in the sink.
11. But it cleans up easily. It is sandy so it takes a little coaxing to get every grain.
12. Here  is the finished product. A nice aged terra cotta planter that looks as if it has a lifetime of stories to tell, or at least a year’s worth.

Liming these 5 terracotta pots took about 30 minutes from set up to clean up. And the best part is that it is inexpensive to achieve this look.

Here is what we spent to do all 5 pots:
$4.89 Garden lime
$5.00 for 4- 6-inch terracotta pots
$3.12 for 4- 4 inch saucers
$2.98 for 1 – 8-inch terracotta pot
$1.27 for 1 – 5.25 saucer
$ .98 cents for paint brush
TOTAL $18.24
We hope you agree that this simple, inexpensive process can make these average planters look like something special.

SaveSave


Growing Garden Arrangement Tutorial

May 2017

This is the second tutorial I’ve done based on the arrangements I designed for a recent luncheon at my home. The first was the rose pavé centerpiece that was on the dining table. This arrangement was on the kitchen island and its form is much more natural and wild as opposed to the tight, compact pavé arrangement.

What you’ll need: Wet foam, a trash bag to be used for a liner, a plastic container deep enough to soak the wet foam, floral preservative, a low, long planter/ container, Gerber daisies, lilies, hydrangea, roses, tulips, moss.

1. Line the planter/container with the trash bag, folding it to fit.
2. Soak the foam. Simply drop it in a container filled with water and floral preservative. Do not push it down. Once all areas are covered with water, the foam is ready to use.
3. Place the foam securely in the container.
4. Place the lilies (the largest flowers) in the foam, allowing for a two-inch insertion. We began in the center and then put lilies on the far left and the far right side. We then repeated that pattern with tulips.

growing garden arrangement tutorial 1 - 4

5. Continue following the pattern with gerbera daisies. We began with the white and followed with the pink. (You’ll notice that the gerbera daisies have been wired – we’ll have a separate tutorial on how wire flowers).
6. Place the hydrangeas down low. See how full the arrangement instantly looks when these large flowers added.
7. Add in a few roses and then cover the mechanics with moss.
8. The arrangement is complete!

growing garden arrangement tutorial 5 - 8

SaveSave


Rose Pavé Centerpiece Tutorial 1 comment

May 2017

I arranged this pretty and colorful pavé style centerpiece for a garden party luncheon I hosted this week. Pavé is a French word meaning paved. The pavers on cobblestoned streets are set together very tightly and compactly, hence the concept of this style of flower arrangement. This tutorial shows you step-by-step how to re-create this long and stunning showstopper for your next gathering.

What you’ll need:

A low, rectangular planter, wet floral foam, plastic trash bag, plastic containers to fit inside the planter, a small plastic tub, floral preservative, a knife, roses, angel vine, moss …and, if possible, a furry assistant (you’ll see what we mean!).


1. Select your container. For dining, your arrangement should be an adornment, not an obstruction. We chose this slender antique mirrored rectangular piece as our starting point. You could select a container of any material or length you like, just make sure to keep it low.
2. Cut wet foam to fit into the liner (a container that will be placed inside your rectangular vessel). As you can see, we used a dinner knife but anything long enough will work.
3. Fill a plastic tub with water and a packet of floral preservative (this usually comes with purchased flowers). Once container is full, drop the foam into the water and wait until it is completely under water. This takes about 30 – 45 seconds. Don’t press the foam down as this can create a dry pocket. There is also no need to let the foam soak for hours.
4. Line the container with a sheet of plastic to protect it from any potential moisture damage. We usually use trash bags for this.


5. Place wet, soaked foam into liners and secure them into the planter making sure they fit tightly. We used simple food storage plastic containers for this.
6.It’s always a good idea to have a supervisor and Emma is doing a spectacular job sitting right in front of our work area.
7. Remove any petals that are torn or have large brown spots on them. Determine the height needed, making sure to leave enough stem for a two-inch insertion.
8. Go ahead, take the plunge and make the cut. The first cut is the hardest!

9. Begin placing flowers in pavé style. The idea is to cover your foam completely with roses, forming as level a surface as you can.
10. Take time to enjoy the beauty of each rose!
11. Continue to remove spoiled petals.
12. Look at the color combination you have selected and aim to distribute the colors around evenly.


13. Continue placing the roses pavé style until they have all been set in place and most of the foam is covered.
14. Once all the roses have been set in place, it’s time to deal with the empty spots by covering all the mechanics of the arrangement.
15. Gather the moss and angel vine.
16. Push the moss under the flowers and a bit into the container. Top with sprigs of angel vine and voilà, you’ve made a beautiful pavé centerpiece!

SaveSave


Easter Basket Centerpiece Tutorial 2 comments

March 2017

Easter will be here before you know it so we thought it would be fun to share a simple basket centerpiece tutorial. We chose whites and all shades of purple for this arrangement. It’s very easy to put together so let’s get started…

What you’ll need: A small wicker basket, plastic liner, wet floral foam, scissors, floral preservative, floral tape, hydrangea, purple stock, purple tulips, magenta carnations, waxflower and greenery.

1. We begin with a small wicker basket.
2. Make sure when using a basket to always place a plastic, waterproof liner in the bottom so that any moisture will not escape your arrangement.
3. Soak the WET foam. Remember when working with foam, there is no need to push the foam down or run water over it. Drop the foam in the water and let it absorb the water.
4. Prep your flowers by giving them a fresh cut and placing them in a working vessel of water with floral preservative. This works best if you let them sit overnight or for at least a few hours as it helps perk up the flowers and allows them to last longer.

5. Secure the foam in the basket. We used a bit of floral tape to allow for a more secure fit.
6. Begin with your largest blooms. In this case, we used some beautiful hydrangea blooms. Next, add some purple stock, making sure to work on all sides of the arrangement.
8. Add in a few light purple tulips, some magenta colored carnations and accent with waxflower.
9. To complete the arrangement, fill in and cover up your mechanics with greenery.

Go ahead and try this tutorial for yourself. You will be surprised at how much life and beauty it brings to your table even though it is simple and small. Happy Arranging!

SaveSave


Vertical Pear Floral Arrangement Tutorial 1 comment

January 2017

Last week I had the pleasure of attending the Farmer’s Table Cooking School in Livingston, Mississippi where we learned how to prepare a beautiful and very delicious vertical pear salad. As we were working with the pears, I kept thinking of how beautiful they would look in an arrangement. So,I went back home and created a vertical arrangement with pears that is stunning and easy to do.

1. Gather supplies: vessel, wooden picks, pears, flowers, knife, floral foam and preservative. Cut the foam to fit your vessel. I use a butter knife when cutting floral foam. Make sure to soak it in water that contains preservative and don’t push the foam down into the water. Let the foam naturally soak in the water.

2. Once your vessel is properly prepared with the soaked floral foam, gather the pears and wooden picks.

3. Insert the wooden pick into the bottom of the pear leaving enough of the pick for securing into the floral foam.

4. Place the pears in floral foam trying not to go too far over the rim of the container. In vertical arrangements, all plant materials should remain as close to the container as possible. The height is the key feature in this type of arrangement.

5. Start with the largest and tallest flowers; I used iris. Place three of them in a staggered fashion. Think about how they might grow in nature. In this type of arrangement, the height of the tallest flowers should be 1 ½ – 2 times the height of the container.

6. Add your next flower in the same staggered fashion as though they are shadowing the larger flowers. In this arrangement this flower is solidago.

7. If you used the solidago in its fullest form, it would not really work in a vertical arrangement. Pull some of the width off leaving the tallest stems for use in a vertical arrangement like this one.

8. Arrangement in process…

9. The poms also benefit from thinning out; leave the tallest stems for this arrangement. Place them to shadow the solidago.

10. These yellow poms have been pulled off the main stem leaving them with a much shorter stem to work with which is perfect for tucking them in under the larger flowers and around the pear.

11. Surround the yellow poms with the smaller purple poms clustered together. Again, these have been pulled off the longer stem.

12. While this type arrangement really is a front view design, the back remains important. If left empty it does not complete the whole design, so remember to work on the back in the same fashion as you did in the front.

13. Using a bit of greenery can help hide all of the mechanics and add another texture.

14. And here we have our finished Vertical Pear Floral Arrangement. I always step back from a finished arrangement so I can see if any material needs to be added. In this case, I filled some empty spots with a few flowers and added some branches for interest. Taking a photo is another good way to see where empty spaces may be. I hope you give this arrangement a try for yourself. This works best with two colors of flowers. In this example, I chose direct opposites on the color wheel. Direct opposites usually work very well together in design.

SaveSave