Monthly Archives: September 2015


Signs of Fall

September 29, 2015, posted by Gina – The first “official” day of Fall was just last week but my car temperature reading showed it was almost 90° that day. Though it’s been a bit cooler than the sweltering hot days we have grown accustomed to, I would not consider this a Fall day. But the good news is that while it may still be warm outside, all of the signs of Fall can be found at just about every turn.

Fall collage - 4

At the grocery store, a loaf of pumpkin chocolate chip bread practically jumped into my cart along with a pack of orange and brown plaid napkins. Together they will make a fun and cute Fall treat. I also had a myriad of errands to run that day and one of them was a stop at the farmers market. Look at the last of the summer bounty I brought home with me. We had guests over last weekend and I cooked those fresh vegetables along with some salmon.
Besides mums, I believe crotons welcome Fall just about better than any other plant because they are very hardy and last up until the frost. I usually only buy a few mums because their life span is so short and they can dry out very easily. Even knowing this, I just love how they look and four plants came home with me.

Fall Collage - three
I promised myself I was not going to buy pumpkins, but the ones above rode home with me anyway. I plan on getting more pumpkins but at a later day. My autumn joy sedum is blooming. When I first planted this small container full of succulents, they were barely 2 inches tall. Over the summer they withstood unbelievable eastern sun and practically no rainfall since July 4th. I did take care and water them from time to time. These are called autumn “joy” because they flower from August until November. The bloom starts off a light pink in August and as times passes they turn a dark red color. How cool is that? And finally, I made some door wreaths using succulents for my front doors.  I make most all of the arrangements you see on this website for other homes though I take pictures before they reach their final destination.


French Garage Sales (without the garage) 2 comments

September 27, 2015, posted by Michelle – September is a big month for vide-greniers (attic sales) in France, or what we’d call garage sales. But in lieu of actually being in garages, the sidewalks of a main street become packed with tables of household items and clothes being sold by residents of the neighborhood. It was a sunny, crisp fall day today so I took advantage of it by visiting several vide-greniers. You never know what you’ll find but I always find some wonderful things and today was no exception as I picked up some beautiful vintage linens and a few other items. Enjoy the photos(click on any individual photo to enlarge it):

Let us hear about your garage sale or estate sale experiences. To leave a comment, click on the title of the post and the comment form will appear at the bottom of the post.


Red Sunflower Tablescape

September 12, 2015, posted by Gina – For some reason I always seem to find red sunflowers this time of year. I absolutely love them and in fact they were the inspiration for this whole tablescape.

Red Sunflower, Spode Italian Collage
I was trying to create a natural, farm fresh vibe with this table and decided adding artichokes and arugula to this arrangement accomplished that look very well. The ceramic containers are a perfect fit for a regular brick of oasis. This makes creating arrangements in these containers so easy and I have used them many times for similar centerpieces. Also, the fact that they are low makes having a lovely conversation easy since you don’t have to peek over or around an arrangement.

To keep the natural, farm feel going I chose a great burlap table runner and combined it with red and white toile placemats, striped napkins, white wooden chargers, and Italian Spode china. Somehow, the pheasants just seemed to fit in with the theme so I placed a pair on each side of the table. If you run across some red sunflowers be sure to pick a few up as they will brighten up your table.

We’d love to hear your thoughts and comments. Click on the title of this post and the comment form will open at the end of the post.


French Shopping Excursion 1 comment

September 10, 2015, posted by Michelle – September is a big month for us as there are several big braderies (sidewalk sales), brocantes (flea markets) and vide-greniers (garage sales) in and around Lyon. We’ve mapped out a few and plan on showing up early and finding some beautiful French linens for our shop. In the meantime we visited our favorite garden center/home décor shop where we found these great iron house numbers with fleur de lys details and the cutest snail candle holder:

Numbers and snail

But we were really excited to discover that they carry one of our favorite planters, the Goicoechea.

Goi PotteryGoicoechea is a family owned pottery in the town of Ossès in the Basque region of France that’s been making their planters and pots by hand for three generations. Their trademark technique is throwing clay onto a form covered with thick rope. The rope is carefully removed when the clay is only half set and the resulting rope imprint in the clay is so striking. This shop didn’t sell that particular planter but had a large selection of other Goicoechea creations.

Fait Main potteryThis is a very beautiful video in which the family members and workers in the Goicoechea pottery explain their creative process and the importance of transferring know-how from one generation to the next. You can see their pottery, including the rope pieces, and some quick shots of how they actually make it…it’s in French but the images speak for themselves. Enjoy!


Visit the Goicoechea Website

Have any comments for us? We’d love to hear from you! To get to the comment form, just click on the title of this post and the form will appear at the bottom of the post.


Crab Cakes

September 9, 2015, posted by Gina – Last week I made crab cakes for the very first time. I love crab cakes and for some reason thought that they were just too much trouble to make myself. One of my cookbook club members was going to be out of town for our luncheon and one of our big rules is if you can’t attend you find another member to make your dish. She was charged with making a hot appetizer and asked if I would prepare her dish.

Crab CakesI began my search for something delicious. When I choose a recipe, I like one that is a challenge. Maybe not one that is that hard, but one that I have never made before. I truly believe it makes you a better cook and broadens your cooking horizons. I saw a recipe for crab cakes and thought how delicious they would be. That little voice in my head told me they were too much trouble. I continued my search but could not get the crab cakes out of my mind. Something took over and I decided to face my fears and choose the crab cakes.

Really, these are very easy to put together. The recipe came from Barefoot Contessa. I recommend making the crab cakes and keeping them in the refrigerator the day before. Close to serving time, you can fry them up and have them ready. I also made the fabulous remoulade sauce the day before.

Here is the recipe:

Ina Garten’s Crab Cakes and Remoulade Sauce

Ina says you can keep these warm in a 250° oven which I highly recommend if you are having guests over. I had three skillets on my stove preparing these babies. While they’re warming in the oven, you can clean your kitchen and skillets and look like a pro when your guests arrive. Every single lady in my cookbook club loved these crab cakes and the remoulade sauce. This is a must try.


Sunflower and Hydrangea Tutorial

September 2015

Late blooming summer flowers are the stars of this cheerful, fresh floral arrangement. Follow our step by step tutorial below on how to make it.

Sunflower and Hydrangea Arrangement - Late Summer

UntitledSteps 1 - 4

Step 1. For this arrangement you will need a large cylinder glass vase, floral tape, floral knife, floral food, scissors, mini sunflowers, hydrangeas, greenery and burlap.

Step 2. Prepare a grid on the vase using the floral tape. Make sure that no part of your vase is wet before placing the tape on the vase. The grid makes it much easier to arrange the flowers and provides for better placement.

Step 3. Make sure to always use the flower food provided with the flowers. Pour the whole packet into the vase and fill with water.

Step 4. Since this is a rather tall vase, remove any foliage from the bottom stems. If foliage is left on the stem and then placed in water, a bacteria will form that will shorten the life of the flowers.

Steps 5 - 8

Step 5. Begin adding greenery to start the form of the arrangement. Try looking around your own yard for some interesting greenery. We used some great limelight hydrangeas from our backyard. But don’t cut too many or next year your plant will not produce as many. Depending on the time of year of your cut, the blooms may already be set for next year.

Step 6. These Sweet Bay Magnolia leaves will create a bit of drama in the arrangement. If you don’t have one of these in your yard, look at other trees and bushes for inspiration.

Step 7. Once you have the form loosely set, you can begin to add the flowers. We love how these mini sunflowers add a pop of color against all of the greens and textures.

Step 8. The finishing touch – we wrapped a bit of burlap around the vase to create a rustic look.

Let us know what you think of this tutorial. If you have comments, suggestions or questions, please click on the title of this tutorial and the comment form will appear the end of the post.


Plum Tart – Late Summer Fruit Bounty

September 7, 2015, posted by Gina – I attended my much anticipated Cookbook Club* luncheon last week. I was charged with preparing a non-chocolate dessert and I will admit that I am not a big fruit fan. There, I said it. When I think of dessert the first thing that comes to my mind is chocolate so this task was a challenge for me. We are currently cooking out of the Barefoot Contessa cookbooks and so I began the search and found there was a large selection of non-chocolate desserts. I ended up choosing to make a plum tart since plums are in season and that’s reason enough.

The recipe, which you can find here: Ina Garten’s Plum Tart Recipe, calls for Italian prune plums but I couldn’t find them so I used regular ol’ plums. Once the plums were in place, I topped it with the flour, butter, sugar, walnut topping and then baked it. The smell was heavenly. Truly, if you want your house to smell fabulous, make this tart.

Plum tart collageBesides pitting the plums this was a very easy recipe to follow. In fact, my cookbook club has loved cooking out of the Barefoot Contessa cookbooks because the recipes are so user friendly. A friend told me that Ina (a.k.a Barefoot Contessa) watches several different people make her recipes so she can see how each interprets the directions and from that she writes the final version. I love that and perhaps this is one of the reasons she has so many cookbooks and a cooking show of her own.

Of all the recipes I have tried from these cookbooks I don’t think there is one that I have not liked. I guess you could say I am an Ina fan. Go ahead and try this tart. I actually really liked it even though it is not chocolate!

*To see all the recipes we’ve posted from our Cookbook Club lunches and to read a bit about the club, visit the Cookbook Club category in the sidebar under “Our Recipe Collection”.

If you make this tart let us know what you think about it! Clicking on the title of this post will open a comment form that will appear at the end of the post.


Fall Door Arrangement Tutorial

August 2015

Let’s usher in Fall with a new door arrangement made of silk flowers to welcome our friends and neighbors. You can do this yourself and we have a great how-to that guides you through each step.

Both arrangements on doors
I love our French doors at the entry of our home, but whenever I want to put a wreath or arrangement up I need to remember that I will need two. Maybe many of you have French doors as well. This tutorial will work for either single or double doors. Lucky you if you only need to make one. I collected all sorts of goodies for this fall inspired design. I am still in love with succulents so I found a few that I really liked. The snowball spray and black eyed Susan along with the burnt orange baby mums relay a feeling of late summer or early fall. I found the wonderful woven cone baskets about a month ago on sale. Having two doors, I of course purchased two and decided they would make pretty arrangements. You can find similar cones at craft stores or gift shops. Of course, we will be carrying a variety of great baskets once our online shop opens.

TitleSteps 1 - 4 collage

Step 1. Gather your supplies. You’ll need 2 cone-shaped wicker baskets, scissors, a wire cutter, a knife, 3″ wide ribbon, 4 bricks of dry oasis, a few sprigs of filler (any type of greenery), snowball spray, black eyed susan, burnt orange baby mums, succulents, angel vine and Spanish moss.

Step 2. Cut the foam to fit the container. You want it very firmly in place in the container. Here I cut a little at a time until I had to press pretty hard to get it situated. I found that using two bricks was the easiest way to fill my container. Getting this part of your mechanics in place is very important. You want your flowers to stay right where you place them. Make sure you are using “dry” oasis. It is made for silk flowers and is sturdier than a “wet” oasis which is used with fresh flowers.

Step 3. Here you see how the foam looks. There is no science to this. I used a floral knife, but any knife will work, to shave a bit at a time. I went from corner to corner until the foam was tight and did not move.

Step 4. You want your foam to stand a little taller than your container. This way, it is easier to fill with your pretty elements and have them appear as if they are spilling out.

Steps 5 - 8

Step 5. Using a wire cutter, cut stems off of the baby mum branch so that you can intersperse this fabulous color in your arrangement.

Step 6. Before beginning to actually place the flowers in the foam, I create a bit of a hand bouquet to get an idea of placement and color.

Step 7. And we are off! There is no easy way to dive into this. You just have to take a big jump and stick those flowers right in. You want a very good idea of where you want the placement to be because your foam is only so big and too many holes will create a foam that does not support the flowers. This looks a bit sad right now, but just wait.

Step 8. Now add the filler, I chose a great looking fern. Filler should be placed in areas where it enhances the flowers and the arrangement.

Steps 9 - 12

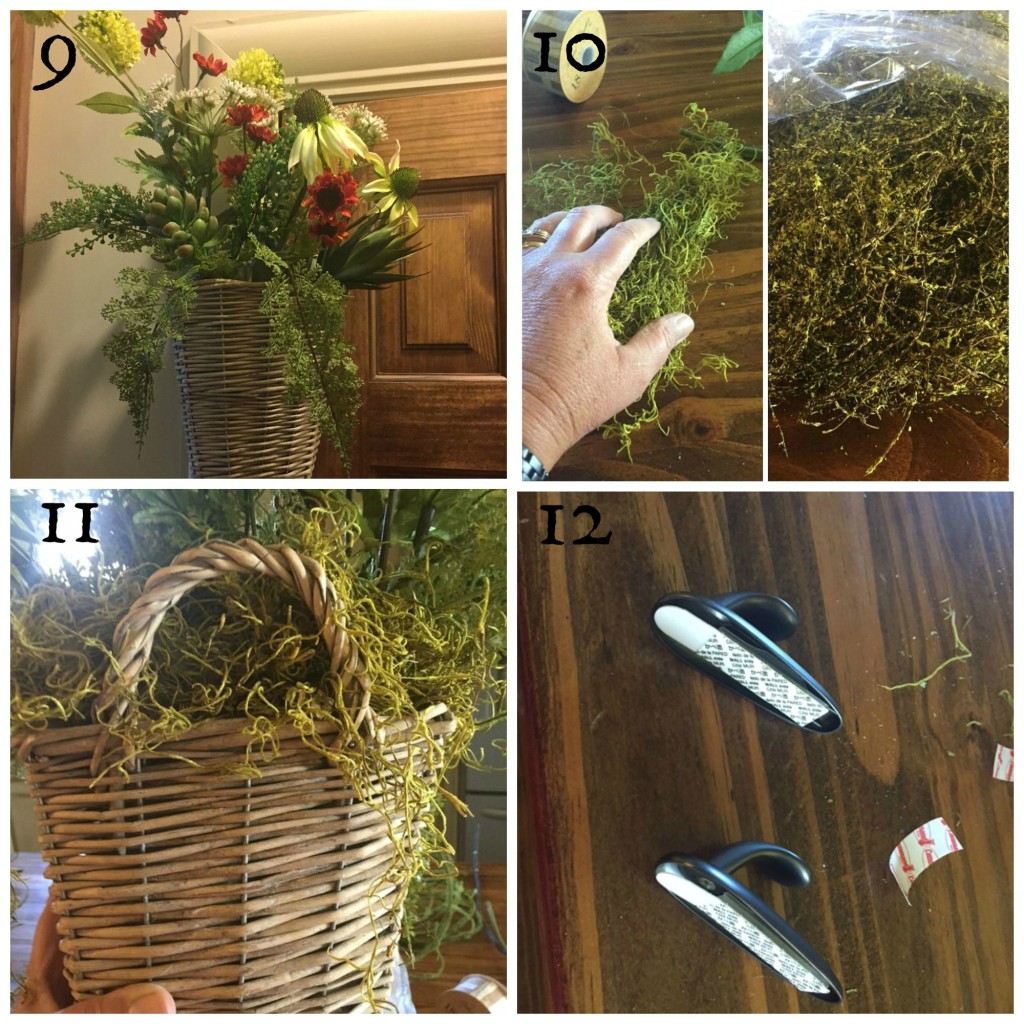
Step 9. Here we see an arrangement that looks complete but upon further inspection you can see some holes. This is where you fill in with the Spanish moss and Angel Vine. The Angel Vine gives the arrangement a bit of texture and natural look.

Step 10. These fillers are really your best friends. They are like concealer for your face or a comforter on your bed. I love this chartreuse colored moss, but it also comes in several other colors and of course it is very pretty in its natural state of gray. Just tuck these in wherever you can see the foam or to fill in an empty space.

Step 11. Don’t forget the back of the arrangement. This is the part that YOU will see from the inside of your home if you have a glass front door like me.

Step 12. I used the Command hooks on my front doors and they work great. Make sure you purchase the ones that hold at least 3 pounds. I chose the oil rubbed bronze for my finish but they also come in a few other colors.

If you try creating this yourself or it inspired you to create something similar we would love to see it! Have questions, comments or ideas? Click on the title of this tutorial and the comment form will appear at the end of the post.
Happy Beginning of Fall!