Monthly Archives: January 2017


French Winter Garden: Color and Life 2 comments

January 31, 2017, posted by Michelle – It’s been bitterly cold here in Lyon for the past three weeks or so and it’s been rainy more often than not so as a result I’ve been spending a lot of time inside. Cabin fever has set in and I’m really looking forward to Spring and some sunshine. Today I took advantage of a slight reprieve, the temperature climbed up to 50º, by going for a run in the Parc de la Tête d’Or. I brought my camera along too in an effort to take a few shots of some winter beauty in the gardens on this last day of January.

The artwork above is a mural, painted on the glass wall of the movie theatre next to the park, by the Chinese artist WENNA – www.wennastudio.com. It could be the cabin fever talking but to me it represents winter blowing his last cold, harsh winds as yellow Spring flowers creep up behind him. At any rate, I certainly found some happy colors which helped brighten up this grey day! I hope you enjoy the photos below of the park’s winter palette, twisted trees and fine feathers.


Super Bowl Party

January 24, 2017, posted by Gina – The Super Bowl is coming up and I’ll be hosting a party at my house again this year. Last year Son 2 and all of his friends came to our home for the Super Bowl and we went all out with football shaped plates, Super Bowl pendants and plastic cups. All of that was a lot of fun but I wanted to change things up this year and create a football themed table that’s not so predictable. I also posted four recipes for a Super Bowl party that won’t sabotage your post-holiday diet. See those on the RECIPE PAGE.

For this table, I made the black and white striped runner from fabric I found at the craft store. I picked up a few galvanized chargers, which fit this theme perfectly, at Kirkland’s. The white plates are Southern Living “Alexis” from Dillard’s. I have a stockpile of all kinds of napkins so these greens ones came from my collection. I threw in (pun intended) the footballs for a bit of fun.

The floral arrangement was simple to pull together. I used pink tulips, kermit mums and greenery. These were the first kermit mums I have ever found with a brown center. I really like them and hope to find them in the future.


4 Super Bowl Party Recipes That Won’t Kill Your Diet 1 comment

January 24, 2017, posted by Gina – It happens every year. Many of us may have indulged over the holidays and by January 1 we have started diets that include healthy shakes, veggies, fish or other light fare. Far from our thoughts are the decadent foods of the holidays. Then suddenly it’s time for the Super bowl. At the first invitation to a Super Bowl Party, we begin to sweat about eating something other than the healthy foods our bodies and minds have adjusted to for over a month. After all, we have made progress, hopefully. Our jeans fit nicely again, our exercise routine has ramped up and we are feeling better. How on earth can we ruin all of that? The fear is real!

Let’s try something a little different by indulging a little but not fall off the wagon totally. With these four simple recipes, we can have some gridiron fun without busting our weight loss goals. Instead of creating a menu filled with many appetizers, here we have a meal that will make you forget about those calorie laden finger foods.


Some notes for the Mexican Salad with Cilantro Dressing recipe: This beautiful layered salad works well in a pretty glass bowl or trifle bowl. Some stores sell thinly sliced lettuce in a bag. We suggest shredding the Monetary Jack cheese yourself rather than using the pre-shredded kind. If you need to save time, some stores sell pre-cooked bacon slices. This is an easy recipe but has many steps. Go ahead and prepare your beans and dressing in advance. You can chop your veggies the day before and they will keep in plastic bags. Following these steps makes this salad easy to put this together and creates a beautiful dish.


A Pair of Pairs

January 17, 2017, posted by Gina – Recently, I had the pleasure of attending the Farmer’s Table Cooking School in Livingston, Mississippi where we learned how to prepare a beautiful and very delicious Vertical Pear Salad. As we were working with the pears I kept thinking of how beautiful they were and naturally my thoughts went straight to floral arranging. On the recipe page I have posted the recipe for the Vertical Pear Salad. You will also find a tutorial showing you how to make a Vertical Floral Pear Arrangement on our tutorial page. Both of these are a lot of fun and with the tutorials provided you should look like a pro in no time.We hope you enjoyed our Pair of Pears and that it provides you all the details you need to create these fun arrangements on your own.

Take me to the Vertical Pear Recipe!

Take me to the Vertical Floral Pear Arrangement Tutorial!


Vertical Pear Salad 1 comment

January 17, 2017, posted by Gina – I recently attended a class at the Farmer’s Table Cooking School in Livingston, Mississippi where Chef Matthew taught us his recipe for a Vertical Pear Salad. Don’t let the architectural nature of this salad intimidate you. I show you step by step how to cut and layer the pears to create this delicious beauty.

Start with very ripe pears, a knife, a vegetable peeler, a melon baller and the ingredients. I used a red pear here but we used Bartlett pears in the cooking school. Peel the pear completely.

Slice the bottom of the pear so that it will be flat and able to stand up without wobbling. Scoop the core out of the pear with the melon baller…it may take a few scoops.
Slice the pear into four even pieces then place the bottom piece of the pear on the plate first.

Add a little salad and continue layering in the same fashion with salad in between each pear slice.

This is really a simple salad but the flavors are so fresh. I started thinking of how I would put something like this together for several guests. Here are my two cents: a few hours before serving I would prepare my salad ingredients but not toss them. I would go ahead and slice and core my pears and place them individually in plastic bags. I would assemble them right before serving. They do not take that long to put together if everything is ready. ENJOY!!


Vertical Pear Floral Arrangement Tutorial 1 comment

January 2017

Last week I had the pleasure of attending the Farmer’s Table Cooking School in Livingston, Mississippi where we learned how to prepare a beautiful and very delicious vertical pear salad. As we were working with the pears, I kept thinking of how beautiful they would look in an arrangement. So,I went back home and created a vertical arrangement with pears that is stunning and easy to do.

1. Gather supplies: vessel, wooden picks, pears, flowers, knife, floral foam and preservative. Cut the foam to fit your vessel. I use a butter knife when cutting floral foam. Make sure to soak it in water that contains preservative and don’t push the foam down into the water. Let the foam naturally soak in the water.

2. Once your vessel is properly prepared with the soaked floral foam, gather the pears and wooden picks.

3. Insert the wooden pick into the bottom of the pear leaving enough of the pick for securing into the floral foam.

4. Place the pears in floral foam trying not to go too far over the rim of the container. In vertical arrangements, all plant materials should remain as close to the container as possible. The height is the key feature in this type of arrangement.

5. Start with the largest and tallest flowers; I used iris. Place three of them in a staggered fashion. Think about how they might grow in nature. In this type of arrangement, the height of the tallest flowers should be 1 ½ – 2 times the height of the container.

6. Add your next flower in the same staggered fashion as though they are shadowing the larger flowers. In this arrangement this flower is solidago.

7. If you used the solidago in its fullest form, it would not really work in a vertical arrangement. Pull some of the width off leaving the tallest stems for use in a vertical arrangement like this one.

8. Arrangement in process…

9. The poms also benefit from thinning out; leave the tallest stems for this arrangement. Place them to shadow the solidago.

10. These yellow poms have been pulled off the main stem leaving them with a much shorter stem to work with which is perfect for tucking them in under the larger flowers and around the pear.

11. Surround the yellow poms with the smaller purple poms clustered together. Again, these have been pulled off the longer stem.

12. While this type arrangement really is a front view design, the back remains important. If left empty it does not complete the whole design, so remember to work on the back in the same fashion as you did in the front.

13. Using a bit of greenery can help hide all of the mechanics and add another texture.

14. And here we have our finished Vertical Pear Floral Arrangement. I always step back from a finished arrangement so I can see if any material needs to be added. In this case, I filled some empty spots with a few flowers and added some branches for interest. Taking a photo is another good way to see where empty spaces may be. I hope you give this arrangement a try for yourself. This works best with two colors of flowers. In this example, I chose direct opposites on the color wheel. Direct opposites usually work very well together in design.

SaveSave


Kitchen Tour

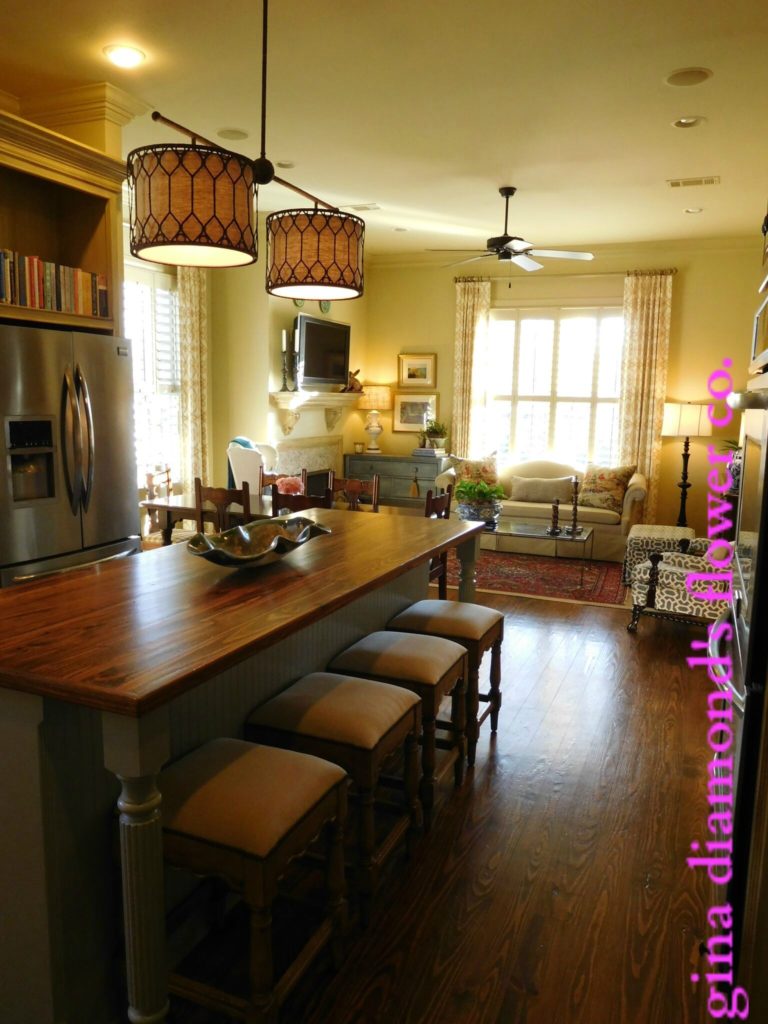
January 11, 2017, posted by Gina – It has been written time and time again that the kitchen is the heart of the home, a place where everyone inevitably gathers. This is certainly true in my home and since many floral arrangements and recipes are created in this room, I thought it would be fun for you to see the whole space and get a little history on it. This post is longer than my typical post so grab a cup of coffee and join me on a tour of my kitchen.

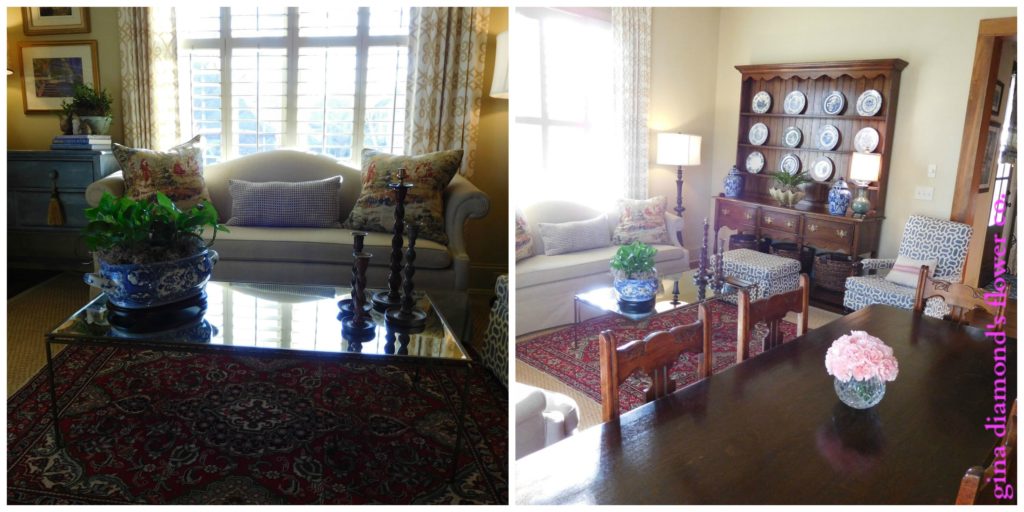
Keeping Room | When our realtor took us through our house when we were house hunting, the keeping room had already been stripped of furniture and decor by the previous owners. As my family and I walked the space we had no idea how we would use it. We were coming from an older, traditional home. It seemed that perhaps only a table would fit in the middle of the space with maybe a buffet on the larger wall. I tossed and turned many nights after we purchased this home wondering just how we would use this space. Upon moving in we found that once furniture was actually in the space it was much larger than it appeared than when it was empty. This has become our absolute favorite spot in our home. It has great light and is very cozy.

Antique Welsh Cabinet | While this wall was very large, we did not have much depth to work with. I found this Welsh cabinet at an antique shop close to our house and knew without a doubt it was the perfect piece for this space. By now you’ve probably guessed I have a love of blue and white and this piece is the perfect host for my collection.


Family Heirloom Chest | This blue chest has quite a history. My mother-in-law purchased this in the 1940’s. It was one of those orange hued, maple chests. After many years passed, she gave it to her sister who antiqued it a nice harvest gold in the 1970’s. When her sister passed away, her daughter felt it belonged to us since it had originally been my mother-in-laws. The yellow really did not work in our house and so we had it painted this wonderful distressed blue. I love the blue against the neutral walls.


The TV | I fought having a television above the fireplace. I envisioned a lovely painting and stood firm in that decision until boys eventually won the battle and up the tv went. Now I can’t imagine the room without it. It keeps me company while cooking. I decided to place the Majolica plates above the television to give it some kind of decorative interest and pretty color. This collection makes me happy everytime I look at it.


Main Kitchen | Here you see the heart of the kitchen. When I first saw the wooden island I thought I would need to replace it as I cook so much and surely I would tear it up. Well, it is very tough and looks exactly the same as it did on the day we purchased the house. I treat it with mineral oil to keep it looking nice.


Cookbooks | This is one spot in the kitchen dedicated to my cookbooks These are the ones I use most frequently. As you can see, I am an Ina Garten fan!


Granite Counters | Here you see our granite counters and more Blue & White with these ginger jars.


Sink | This is our sink and my least favorite part of the kitchen. If I could start over I would choose one deep single sink and I would have a lower, larger window. I have this in the back of my mind for the day when it is time to remodel the kitchen. I do really like the window treatment and the pendant lighting. We added the pendant because previously there was only a recessed light.

Stove | Here is our vent hood and stovetop. Lots of cooking goes on in this area.

Bar | We have enjoyed the wine cooler, love the double ovens and I am so happy to have a bar area that works perfectly when entertaining.


Keeping Room | A view of the keeping room from the kitchen.

Hallway, Pantries and Locker | While this area seems like just a hallway, it holds two large pantries and a locker which, as you can see, I have taken over with my bags.

ACCESSORIES

Hand Imprints |  Each family member at some point had a permanent imprint of their hand made. Mine is the copper one and I remember doing it when I was five years old. Mr. GDFC’s is the green one and he was also five years old. I wonder if it had been a right of passage to have these made at five years old or if it is just a coincidence. The larger colorful one belongs to Son 1 and the smaller one belongs to Son 2. Son 1 was taking an art class and little brother joined in. Son 1 was 8 years old and little brother was 2. I love that we each have one of these.

Local Art |


Double Drum Chandelier | We replaced the previous chandelier with this one which is perfect for the length of the island.


Majolica and Blue and White |  This Majolica and Blue & White transfer-ware are two of my favorites. I love this Blue & White footbath and keep it filled with something green all year long


Rabbits | I have a love of rabbits. I am not sure where this comes from but nonetheless, I love them. Here they are nestled under pottery filled with ivy.


Plate Collection | These plates were collected over a period of years. Some of them are very nice and some of them are them are from inexpensive sets. I love that they all exist beautifully together.


Toile | This toile fabric was the starting point for all the other materials chosen in this space. It has been around for a while.


Curtains | These linen curtains softly frame the room.

Paintings and Prints |Both of these paintings (left) came from people we know and that makes them very special to us. The colors are fun and the subject of mushrooms and lemons seems to fit perfectly in a kitchen. These prints (right) are from David Lynch who specializes in scenes from Memphis as well as the ever popular 30A. His distorted perspective and bright colors set these apart from typical city scenes. Take a look at his work on his website David Lynch Art.

FURNITURE 
Table | This kitchen table and chairs came from somewhere in Europe and were in pretty bad shape when I purchased them but I could see the original beauty underneath. After much scrubbing, cleaning, staining and new seat cushions I was so happy with the end result. The table is narrow enough to fit our space perfectly and I can add an additional chair on each side if we have a large group.


Lamp | This lamp is a true story of “one man’s trash is another ones treasure” . A friend of mine moved into a new house and found this beautiful porcelain lamp in the attic. Knowing my love of Blue & White she reluctantly asked if I wanted it. I could not get it out of her hands fast enough. The shade was torn and dated. I cleaned the lamp base up and found this burlap lamp shade which is a fun contrast to the porcelain.

Candlesticks | These distressed candlesticks may look old but in fact they are new. They add a nice pop of color to the mantle.


Chairs | We call this wing chair (left) the “reading” chair mostly because it is beside the fireplace and does not face the TV. This chair (right) had lived a long hard life when I found it. I think it was ready to be sent to pasture but the wood details on this chair were far superior to anything you would find today so basically we had this chair reworked with new fabric, stain and had an ottoman custom made to fit perfectly with it.

I hope you enjoyed this tour and plan to share more rooms with you in the future.


Humble and Kind 2 comments

January 6, 2017, posted by Gina – As we start this New Year, perhaps we all think of ways to make improvements in our lives. It seems that weight loss is usually at the top of the list but when people search deeper, they are really looking at ways to better themselves. This past year, Tim McGraw came out with a song entitled Humble and Kind in which he advises listeners to be humble and kind in good times and in bad. Wise and refreshing words in a sea of music with a variety of messages.

As I was thinking about a post to start our New Year on GDFC I began thinking of “humble “food, flowers and entertaining. It is “kind” to create memories for those you invite into your home. Making your guests feel as if you have wrapped them in a warm blanket and that they are special, even if just for a brief time, can be lots of fun.

Entertaining does not have to be about pulling out the china and crystal but rather the thought that goes behind your wish to invite people into your home.

Let’s start with the flowers. When I think of a humble flower, the first thing that comes to my mind is the carnation. After all, the carnation never needs to take center stage like a sunflower or a hydrangea. A carnation is happy either as a filler or focal point. A carnation will outlast most flowers and needs very little care. It does not need wiring or require extra water. Its petals don’t fall off easily and its natural color is perfect as nature intended it. And best of all it is a very affordable flower. According to Christian legend, carnations first appeared on earth as Jesus carried the Cross. Carnations sprang up from where the Virgin Mary’s tears fell as she cried over her son’s plight. Basically, it’s a tough little dude! At GDFC, we think it is very pretty to arrange carnations “en masse” as we did in the arrangement pictured below. To see how to make it yourself, check out the tutorial HERE.

Moving on to food. The green pea is a humble little guy. Most often you see peas combined with other foods instead of being the star. But in this amazing green pea soup, the pea is perfectly suited for being the main attraction. The Fresh Pea Soup recipe is from Ina Garten and is delicious even if you are like me and peas are not your favorite food. Get the recipe HERE.

And finally, to our table. White dinnerware is certainly humble but its the most versatile item you can have in your kitchen. It requires nothing of you. There’s no gold or silver trim to have to coordinate with and there are no colors or patterns to have to match. The white plate is a blank canvas for you to create whatever theme your heart desires. In this case the white is the perfect contrast to our chartreuse green soup and our brightly colored napkins that are little pieces of art. Sources for table elements;

Textured table runner – HomeGoods
White dinnerware – Pier 1
Flatware – Ballard Designs
Crystal – Waterford….collected over time from local department stores

So, go ahead! What are you waiting for? Invite some friends over to a “humble and kind” evening. You might just find it warms your heart as much as theirs.


Carnation Centerpiece Tutorial 1 comment

January 2017

When you first see this simple arrangement, you may be thinking to yourself you really don’t need a tutorial to pull this together. But sometimes the simplest arrangements can be tricky to pull off so consider these tips. This arrangement went along with our Humble & Kind post….read it HERE.

1. Whenever you begin an arrangement, even a simple one, gather all of your supplies. The typical supplies are found here; floral preservative (yes, you ALWAYS need to use it), knife for proper cutting of flowers, vessel and the flowers.

2. For this arrangement, the flowers will just barely be above the top of the vase. Cut one flower to the perfect height and let it be your guide for the remainder of the flowers. While this vase is not very large, I purchased 2 bunches of carnations (about 24) so that the end result would be very full.

3. If you find carnations that have not quite opened yet, you can gently open them with your hands.

4. Begin by placing one flower in the vase at a 45 degree angle.

5. Directly opposite from that flower add another.

6. Then do same on the opposite side of the container. You want your stems to cross each other. Continue adding flowers until your container is very full.

7. And here is the finished arrangement; humble but a great happy pop of color that does not break the bank and takes about 10 minutes to put together. This arrangement was created for a tablescape and is perfect for a narrow or smaller table and it’s low enough to allow for great conversation. I often create this same arrangement with roses.


Fresh Pea Soup Recipe 1 comment

January 6, 2017, posted by Gina – This Fresh Pea Soup recipe is from Ina Garten and, in typical Ina fashion, is very easy to follow, although I added a few notes. I first tried this recipe with my Cookbook Club and all 12 ladies loved this soup. I prepared this for dinner one evening with some white cheddar grilled cheese sandwiches on French bread and Mr. GDFC was not as over the moon about it as we were. He even said he thought it was “chick food”. This recipe was shared in our Humble and Kind post….to read it click HERE.


The chopped leeks, yellow onion and mint are sautéed in butter then all of the vegetables go in the chicken stock:

In the recipe, Ina instructs us to puree this soup in a blender. I used an immersion blender which was much easier and not nearly as messy.

I finished the soup with an little elegant touch by adding a swirl of crème fraîche. I spooned the crème fraîche into a squeeze bottle which makes it very easy to add a design. I then sprinkled on the chopped chives and a few garlic croutons on top.

Since this soup was going to be the main course of our dinner I decided to make a few French bread, white cheddar grilled cheese sandwiches. I grated some aged white cheddar, sliced a fresh loaf of crusty French bread pretty thin and melted some butter in a skillet. I cooked them for a few minutes on each side on medium heat. Once lightly browned, I took them off the heat and added some sliced tomatoes. Beware! These are simple but very good.

This is a great meal to warm up a cold winter evening.