Monthly Archives: May 2017


Manners on Monday

May 29, 2017, posted by Gina – Happy Memorial Day! We hope you’ve had a great long weekend. As many people drive back from their mini-vacations, this may be the best time to bring up driving and courtesy.

Open road, no traffic, no problems!

Picture yourself driving down the road. You come upon a large amount of traffic. Cars trying to turn left through the traffic are having a very difficult time. You realize if you stay put you can allow a car to go ahead and cross through traffic in front of you. You motion for the person in the car trying to turn left to go ahead. It takes them a few minutes to realize you are motioning to them. Meanwhile, traffic is backing up behind you. The car turning left finally makes their way across the lane.

And then it happens, or rather it does not happen. You don’t get the nod or the wave or the salute. The person totally ignores your effort to be helpful. It feels as if you were slapped in the face. A simple nod or a wave of thanks is very much appreciated by the driver who has taken a few seconds to do something nice for another driver.

What about you? Are you always a little miffed when your courteous behavior goes unacknowledged? Or maybe you don’t mind if someone goes on their merry way without that little wave of thanks?


Fun Stuff on Friday

May 26, 2017, posted by Gina – It’s Friday and we have a round up of some interesting things to share with you: a custom-made wreath, a couple of things at the grocery store and some gardening inspiration.

I created this whimsical wreath for a baby shower. The mom and dad-to-be had selected woodland creatures as the theme in their nursery. The hostess for the shower wanted a front door wreath that could be used at the hospital as well as in the baby’s nursery. Faux ferns, woodland creatures and a name plate complete this adorable wreath.

On a recent trip to Sam’s Club, I ran into two items that caught my eye. The first one was the drink dispenser you see on the left in the picture below. I was initially thinking that the marketers of this product had reduced themselves to finding the need to add alcohol to lemonade to attract people to purchase. Upon further investigation, I saw that it’s hard lemonade kit with everything provided except the vodka. Well, they successfully got my attention!

The second were these cupcakes. The thing that attracted me to them is that they are not in typical cupcake baking cups. When Joanna Gaines of Fixer Upper opened her bakery, these are the types of baking cups she used for her 11 or 12 different flavored cupcakes. I remember watching that episode and wondering about the baking cups because I had never seen them. In doing a little investigating of my own, I found these baking cups on the internet and they are called Tulip Cupcake Baking cups complete with greaseproof paper. How cool is that? I am going to try them next time I make cupcakes. It does give them a nice homemade appearance.

The next few items are all about garden inspiration…

How inspiring is this grouping of plants in the upper left hand corner? From the worn pots to the colorful selection of plants. This photo was taken a few years ago at the Grand Hotel in Point Clear, Alabama. We always use it for inspiration.

We just might get our green thumb from our MOM. That gorgeous clematis is happy in her yard.

Good things come to those who wait. We started this collection of ferns from one single stem and a few years later we had this lush covering.

And we’ll leave you with that last photo in the bottom right corner… Isn’t it amazing that this lush greenery and park setting can be tucked away amongst the hustle and bustle of New York City. Central Park.

Have a great weekend!


Pretty Green Greek Salad 4 comments

May 23 2017, posted by Gina – The colors in this salad are so pretty you could almost skip having a centerpiece on the table. The best part is that this is one of our all-time favorite salads. Easy and healthy!


Making Grocery Store Orchids Look Special 2 comments

May 16, 2017, posted by Gina – These days most grocery stores have a floral department and orchids seem to always be available. The convenience of putting one of these beauties in the cart is almost irresistible. Anyway, they seem to make it into our cart pretty often. We thought it might be fun to show you a few tricks to enhance an orchid whether it be for your own home or to give as a gift. Please note, this is one way to make an orchid look a little more dressed up for the short term and not the way an orchid should be planted if you want to keep it for years.

So, here you see an orchid that was just purchased at the grocery store. The container is not too bad but it’s not great either. The clamp holding the stems together is useful but also not so pretty.

Take the orchid out of the grocery store pot. The orchid will be in another pot, probably a thick plastic one. Place the orchid in its plastic pot into another pot. The pot you choose may be quite a bit larger than the one it was purchased in and you’ll need to secure the orchid in it. We used grocery store bags to push down around the two pots to keep the plant from moving around. We’ll deal with that unsightly clamp in a minute.

Gather a bit of moss around the clamp, secure it with a little raffia and then spread some moss around the bottom of the container. In this photo you can also see how we scrunched the plastic bags down between the pots.

orchid transformation in progress

And here you have what we think is a much more attractive presentation…

repotted orchid

What do you think about our quick transformation? Do you keep an orchid as long as it’s blooming, then toss it and buy a replacement? Or do you lovingly tend to them for as long as possible? Do you think they’re too much trouble or worth the trouble? We’d like to hear your thoughts, so please leave us any comments you may have.


Tutorial: Sunflower Power

May 2017

Sunflowers are happy flowers that command attention. With very little effort you can create a dramatic arrangement with these striking yellow beauties. We’re taking advantage of the width of the sunflowers rather than their height in this design. For this very simple tutorial you’ll only need 3 flowers but that’s all it takes to showcase the positive power of sunflowers.

Here are the supplies you will need:
3 medium to large sunflowers
One clear glass vase about 7-8 inches tall with about a 3 inch wide mouth
Floral preservative
Assorted greenery
Ribbon

sunflower tutorial

1. Cut the sunflowers at 3 different heights so that they can be placed in a staggered fashion once in the vase
2. Arrange the sunflowers in the vase filled with water and flower preservative. Place the tallest flower in the back and the two shorter ones up front.
3. Fill in with assorted greenery.
4. Cut the ribbon long enough that a square knot can be tied. Tie the ribbon and you’re done!

This is a very sweet arrangement that could certainly put a smile on someone’s face. The best part is you only used 3 flowers.

SaveSave


Tutorial: Sunflower Topiary

May 2017

Today we’re showing you how to make this sweet sunflower topiary. It will brighten up any spot in your home and also makes a wonderful gift. Best of all, it’s easy to do…let’s get started..

What you’ll need: Sunflowers, two other kinds of flowers (we used roses and hydrangea), floral wire, floral preservative, wet foam, a plastic container deep enough to immerse the foam in water, a container, a liner to fit the container, ribbon.

1. Select sunflowers and one or two other flowers. We choose bright coral roses and green hydrangea.
2. Prepare a container. Even though this container is waterproof and we have a saucer, we are placing a plastic container in the bottom to prevent any moisture damage.
3. Soak the wet oasis floral foam in a plastic container prepared with water and floral preservative. Simply wait for the foam to soak up the water. There is no need to press the foam down as this could create dry pockets.
4. Cut and fit the floral foam into container making sure there is a tight enough fit allowing the flowers to remain stationary.

sunflower topiary 5 -8

5. Gather sunflowers tightly making sure they are about the same height. Look at them from each direction to make sure the all of them are facing outward. Wrap them with a floral wire.
6. Insert all stems at once into the center of the floral foam.
7. Here the sunflowers are in place.
8. Start to cover the foam with remaining flowers. We chose a combination of coral roses and hydrangea but all greenery or just one type of flower would work great.

sunflower topiary 9 - 12

9. Continue adding flowers until the foam is completely covered. It is also a good idea to cover the rim of the container. This could be done with moss if you used only the roses.
10. Prepare a piece of ribbon making sure it is long enough to make a criss cross pattern on the sunflower stems. Begin at the wire making sure the ribbon covers it. Continue wrapping in a criss-cross fashion until you reach the bottom of the sunflower stems.
11. Here is the wrapped ribbon. You will tie it off once you get to the end. If there is any extra ribbon you can cut it off.
12. And here you have a very happy, sunflower topiary arrangement!

SaveSave


Tutorial: Aging Terracotta Pots with Lime 2 comments

May 2017

Today, we are going to show you how to make new terracotta pots look aged with a light white patina. An aged planter just looks like it has a story to tell and you may not want to wait years to get that look! So, let’s get started…

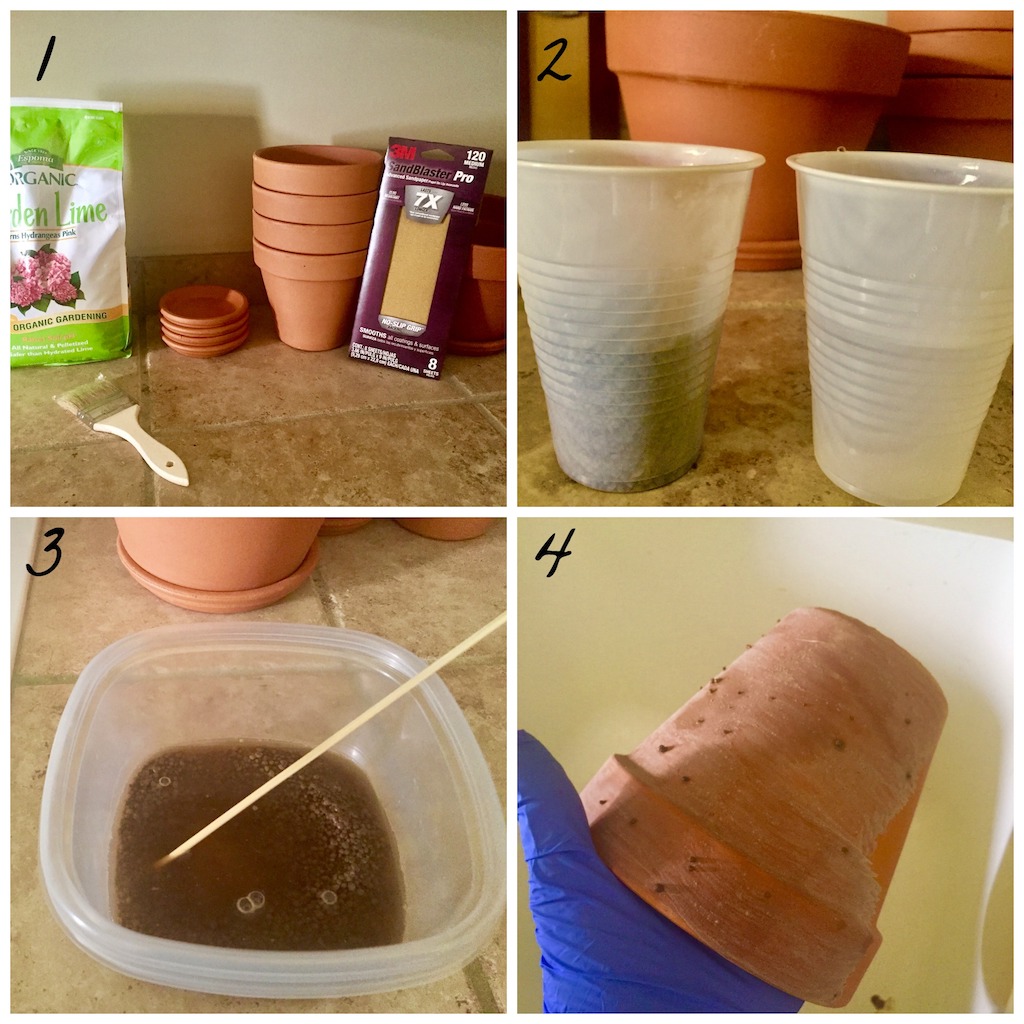
1.For this project you will need the following supplies: terracotta pots and correct size saucers, garden lime (found in a bag in a garden center), a medium grade sandpaper (look in the paint department for sheets instead of the type that attach to an electric sander), an inexpensive paint brush (we paid .98 cents for ours), 2 disposable plastic cups, a stir (we used a bamboo skewer), a plastic container and old newspaper.
2. In the disposable cups, add equal parts lime to water. We used about ½ cup each.
3. Pour each into a plastic container and stir until combined. The lime will not completely dissolve and will have a sandy somewhat lumpy texture.
4. Paint the pot with the lime/water mixture. We went around the pot. It will not be opaque and you will be able to see your brush strokes. This is fine as you will be sanding it all out in a few minutes.

aging terracotta pots

5. Let the pot dry on some old newspaper. This only takes a few minutes.
6. While you have all the supplies handy, it is a good idea to prepare multiple pots so they are ready for future use. Trust us, you will be happy you did this.
7. Allow all pots and saucers to dry. Don’t they already look great?
8. Once the pots are dry you can begin lightly sanding, moving in circular motions.

aging terracotta pots

9. Here you see the pot on the left before sanding and the one on the right is after we sanded. See the smooth, natural looking surface? It’s like magic.
10.  This made a pretty big mess in the sink.
11. But it cleans up easily. It is sandy so it takes a little coaxing to get every grain.
12. Here  is the finished product. A nice aged terra cotta planter that looks as if it has a lifetime of stories to tell, or at least a year’s worth.

Liming these 5 terracotta pots took about 30 minutes from set up to clean up. And the best part is that it is inexpensive to achieve this look.

Here is what we spent to do all 5 pots:
$4.89 Garden lime
$5.00 for 4- 6-inch terracotta pots
$3.12 for 4- 4 inch saucers
$2.98 for 1 – 8-inch terracotta pot
$1.27 for 1 – 5.25 saucer
$ .98 cents for paint brush
TOTAL $18.24
We hope you agree that this simple, inexpensive process can make these average planters look like something special.

SaveSave


Growing Garden Arrangement Tutorial

May 2017

This is the second tutorial I’ve done based on the arrangements I designed for a recent luncheon at my home. The first was the rose pavé centerpiece that was on the dining table. This arrangement was on the kitchen island and its form is much more natural and wild as opposed to the tight, compact pavé arrangement.

What you’ll need: Wet foam, a trash bag to be used for a liner, a plastic container deep enough to soak the wet foam, floral preservative, a low, long planter/ container, Gerber daisies, lilies, hydrangea, roses, tulips, moss.

1. Line the planter/container with the trash bag, folding it to fit.
2. Soak the foam. Simply drop it in a container filled with water and floral preservative. Do not push it down. Once all areas are covered with water, the foam is ready to use.
3. Place the foam securely in the container.
4. Place the lilies (the largest flowers) in the foam, allowing for a two-inch insertion. We began in the center and then put lilies on the far left and the far right side. We then repeated that pattern with tulips.

growing garden arrangement tutorial 1 - 4

5. Continue following the pattern with gerbera daisies. We began with the white and followed with the pink. (You’ll notice that the gerbera daisies have been wired – we’ll have a separate tutorial on how wire flowers).
6. Place the hydrangeas down low. See how full the arrangement instantly looks when these large flowers added.
7. Add in a few roses and then cover the mechanics with moss.
8. The arrangement is complete!

growing garden arrangement tutorial 5 - 8

SaveSave


Manners Monday: Punctuality

May 8, 2017, posted by Gina – It’s a manners Monday again and this time we’re talking about punctuality. You know your friends. You know the ones who will arrive early to a function and who the latecomers will be. Everyone runs late from time to time but what about being consistently late? How about showing up 15 minutes early to a dinner party? And is it ok to be ‘fashionably late” for certain events or in certain situations? If an invitation states that the event is to begin at 8pm what arrival time is considered to be “late”?

Peggy Post’s, The Definitive Guide to Manners, says that, in general, guests should arrive at or shortly after (usually only fifteen minutes) the time stated. We should never arrive early, unless requested. By this definition, I am a fairly punctual person but some may disagree. I have a friend who would call to ask if I was OK if I had not arrived by the exact time specified. It was her way of letting me know that she thought I was late. After a while, I no longer answered her calls. On the other hand, being too early is just as aggravating for the host as being too late.

Some friends and I were discussing tardiness and someone brought up an interesting point. We all feel a negative sentiment if a person is habitually late. For us it means they consider their time is more valuable than everyone else’s. I would never want this to be the case, so I do my best to arrive within 1-5 minutes of the specified time.

Here are some guidelines based on different types of events that may help you from being awkwardly early or unforgivably late:

Almost* Any Occasion or Event: As an invited guest it’s never ok to be early. You will put pressure on the host to start entertaining while he or she may be tending to last minute details. Don’t think by offering to help that’s it’s actual help. It’s not helping, it’s stressful for the host. Get a watch, early bird! *There are exceptions….

*Weddings, Graduations and Funerals: Don’t be late, in fact arrive a few minutes early so you can get seated well before the ceremony begins.

Dinner Party: Don’t arrive early, for reasons stated above. Arrive on the dot as the host will have timing in mind for the courses. It’s nice to let everyone get settled and mingle for a few minutes before serving dinner. If someone arrives late, it throws everything off.

Cocktail Party:  Though they normally last no more than two hours, it’s still ok to arrive 15, not 16, minutes late.

Bridal or Baby Shower: Be on time. As with dinner parties there is usually timing involved and the host may have prepared games or other entertainment for the shower, not to mention the opening of gifts.

I’m not hovering around my front door with a stopwatch or anything and goodness knows I’ve broken a few of these guidelines myself! I just think we should all do our best to be considerate guests.

Do you agree with these guidelines? Are you chronically late or early? Or maybe you’re the perfect guest!? We’d like to hear your thoughts and comments!


10 Things to Know about Succulents 3 comments

succulent containerMay 7, 2017, posted by Gina – I recently planted a few succulents in a favorite container and it had me wondering if our readers have experience with them or are as crazy about them as I am. Since these pretty plants have become so trendy over the past few years, I thought I’d share some information about them.

Browse through any home decorating or gardening magazine and you will come across succulents. Not only will you find them in planters but you’ll likely see succulents in flower arrangements, in flower crowns, incorporated into bridal bouquets, etc.  Suddenly, cakes decorated with “succulents” made of icing and even jewelry made from live succulents are popping up everywhere as well. If you’re considering bringing a few a these into your life, and we highly recommend it, here are few things to know:

small succulents

1. Succulents are low maintenance, fleshy plants that retain water which enables them to survive in hot and arid conditions. They require very little watering but they do need a lot of sun. They come in all kinds of interesting shapes and a wide range of colors.

2. They are easy to grow. Given the right water and light, they will double in size before you know it.

3. They look great in containers. Mix different varieties together to make a texturally interesting and colorful grouping. Or just use one in a really cute vase, like the Celfie vase.

4. They make great gifts. The endless array of shapes (spiky, trailing, lotus-like, wavy, etc.), their compactness and the fact that they are low maintenance make them the perfect plant to give as a gift.

5. Wreaths made of succulents are unique, gorgeous and eye-catching.

6. They are very versatile and can be used in floral arrangements, corsages, centerpieces; the list goes on and on. We also saw some drapery tie-backs at a wedding made of succulents.

7. Be sure to give them plenty of direct light.

8. Allow them to dry out between watering. Never let them sit in water.

9. Use a fast draining soil.

10. Roots should be close to the surface.

Autumn Joy Sedum is one of my favorite succulents because of its gorgeous blooms. This is an old-fashioned garden plant that was very popular during the ’60s and ’70s. The blooms start off pink and as fall approaches they turn a beautiful copper color. If you don’t have one of these, I think you should try to find one. You won’t be disappointed. Try your hand at a succulent container or just start off with one little one. Either way, I’m sure you’ll be successful with succulents!